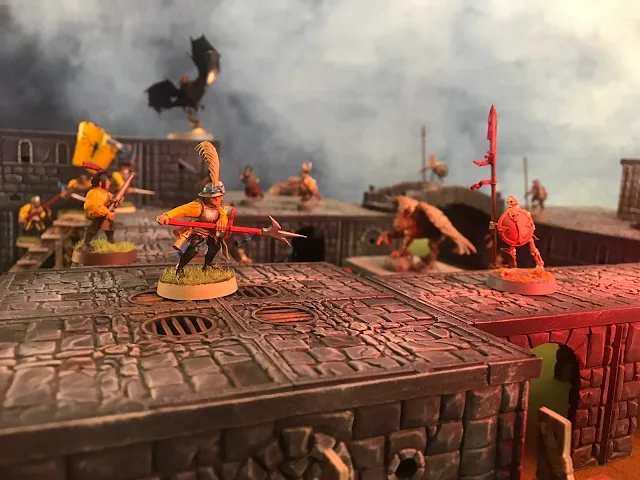
I have a bit of a love hate relationship with miniature photography. On the one hand, capturing the details of a well painted mini is absolutely important, and requires a white or black background to get those crisp photos. On the other hand, that background is boring as all get out. Minis are cool, but minis belong on the battlefield looking cool. They are part of the scene, and that conveys a story to the viewer that you don't completely get from a static, solid color background. In this post, I'll show you how to take cool miniature photographs, even if you don't have your own studio.
Materials
For transparency, I'm experimenting with Amazon Affiliates to see if I can get this blog to be self supporting and so I can provide even better content. It comes at no extra cost to you, if you decide to purchase any of the items. I don't like ads, so I won't post them on this site, and I will only provide links to things I have purchased and like to use. I will also only post them when appropriate, and if I think another site has better materials/offers, I will send you there. Big thank you, and on with the show!
Background - 5x7 ft blue photo backdrop (Amazon)
Frame - HPSUN Backdrop Frame (Amazon)
Lighting - RGB Gaming Lights (Amazon)
Tablecloth - Polyester Fabric Vineyard Green (Joann Fabrics)
Camera - IPhone 7 (or whatever you have available)
Software - Photoleap Editor (Apple App Store) I use the free version, not the pro where they ask you to sign up for a free trial. Just skip that prompt and it should take you to the free version.
Set Up
I have a normal, standard size kitchen table first of all, so this should work for the vast majority of you. Just make sure to let the spouse know you will be using the table for a bit, and try not to do this around a meal. Anyways, I drape the tablecloth across the table. I used the color of green that I did since I think it evokes grass well and lets your brain fill in the rest. You could also use any game mats that you have available, just be aware that in photos they often have a shine to them.
Behind the table, I set up the frame. It comes with 4 rods that go along the top, I only used 3. I then use the provided clamps to hold the backdrop up. This is a photo backdrop that anyone who had picture day in elementary school should be familiar with. Turned to the side, I think it looks like a cool stormy sky. The product was a little wrinkled and smelly when it arrived, but luckily it's machine washable and that solves both of those problems.
Now you can set up your minis on the table. Lighting can be an issue. Since this was daytime, I had to deal with a lot of sun coming in through the patio door. I don't own a studio, and I imagine most of you don't either, so this is as close as we can get. I closed the blinds fully to mute some of the light and I took my first picture:
The Photography
Now that all of that is complete, we can move onto photos. First, you photo can fulfill three roles: information, action, or both. You achieve this by composition, which is a fancy term, but I'll boil it down to two things: angle and lighting.
Information tells you what it is or showcasing the techniques used to achieve a look. Often this is against a single color background to highlight the object itself. You see this a lot with high level painting or sculpting, where the miniature isn't necessarily on display as much as the paint job is. The prime example of this is Non-Metallic Metals, or NMM.
The final tool you have in your arsenal is photo editing. Now, some may consider this cheating, but I think as long as you're not trying to pass off a filtered paint job as better than it actually is, you're all good. Your phone already has several options in it, but I went an extra step in using Photoleap Editor. In the below image, I took a photo I already had and added a layer of rain over it. The app provides some excellent tutorials of how to achieve this effect, and I would recommend it to those trying to do more with less.
And with all of that advice, you should be able to go and get some cool shots! It takes some experimenting, but eventually you'll find your style! Thanks for reading, and let me know down in the comments if it was helpful or any other areas that I could improve.
-The Space Dinosaur


Nice tutorial. Excellent points throughout. Shows how much effort actually goes into taking a good photo.
ReplyDeleteBeyond using the filter to brighten up my own photos I’ve never bothered with the rest. My painting is all that good anyhow. 😀
Thanks! I think you have some great painting, I always enjoy your posts!
Delete