For about the past month I've been toiling away at creating some raised platforms for wargaming. This is terrain suitable for Age of Sigmar, Warcry, Mordheim, Frostgrave, you name it. I wanted to add some verticality to my games while holding onto some modularity so that my game boards don't all look the same. I've included some
WIP pictures in previous posts, but I have now fully built, painted, and photographed my platforms. I have to say that I'm really happy with how they turned out, and now I'll show you how I made them, plus some glamor shots at the end.
Before I start any project, I delve into photos for inspiration. Of course, I looked at Mordheim boards that people have created before, but I also looked into some real life locations. Venice, with its canals and bridges, provided some key references for me to work off of. So with that out of the way, lets get into the meat and potatoes of the project.
Materials
Fantasy Core Set - Archon Studios: I got 2 from their Dungeons & Lasers Kickstarter, and I've reviewed the set
here. You'll use the floor and wall tiles, as well as the pegs and clips. You can of course use less or more, but 2 got me what is shown in this post. They also have other styles, so if you want to mix it up, feel free. The little bridges came from the stretch goals of the Kickstarter.
Foamcore: I used black foamcore so I wouldn't have to worry about painting it. Any kind will do, and I got mine from Michael's.
Popsicle sticks: The standard size from the craft section of any large retailer, I got mine from Walmart.
Wooden Dowels: Any size, just make sure its easy to cut. Also from Walmart.
Matchstick dowels: The rectangular prism stick that form the body of a matchstick, but without the burning head part. I got these in the craft section at Walmart as well.
Glue: I used hot glue, super glue, and plastic cement.
Primer: I used flat black spray paint. My favorite brands are Krylon and Rustoleum, they give good coverage with no shine. Use whatever you have available to you.
Paints: I used craft paints from cheap bottles I got at Michaels. You do not need anything fancy, just get a couple for whatever paint scheme you want to use.
Lemax Cobblestone & Brick Roads: I got these from Michaels, they are a rubbery material used to make roads and plazas for Christmas decor. I used them to make ramps, and technically could be used to replace the Fantasy Core Set if you're looking for something cheaper.
Construction
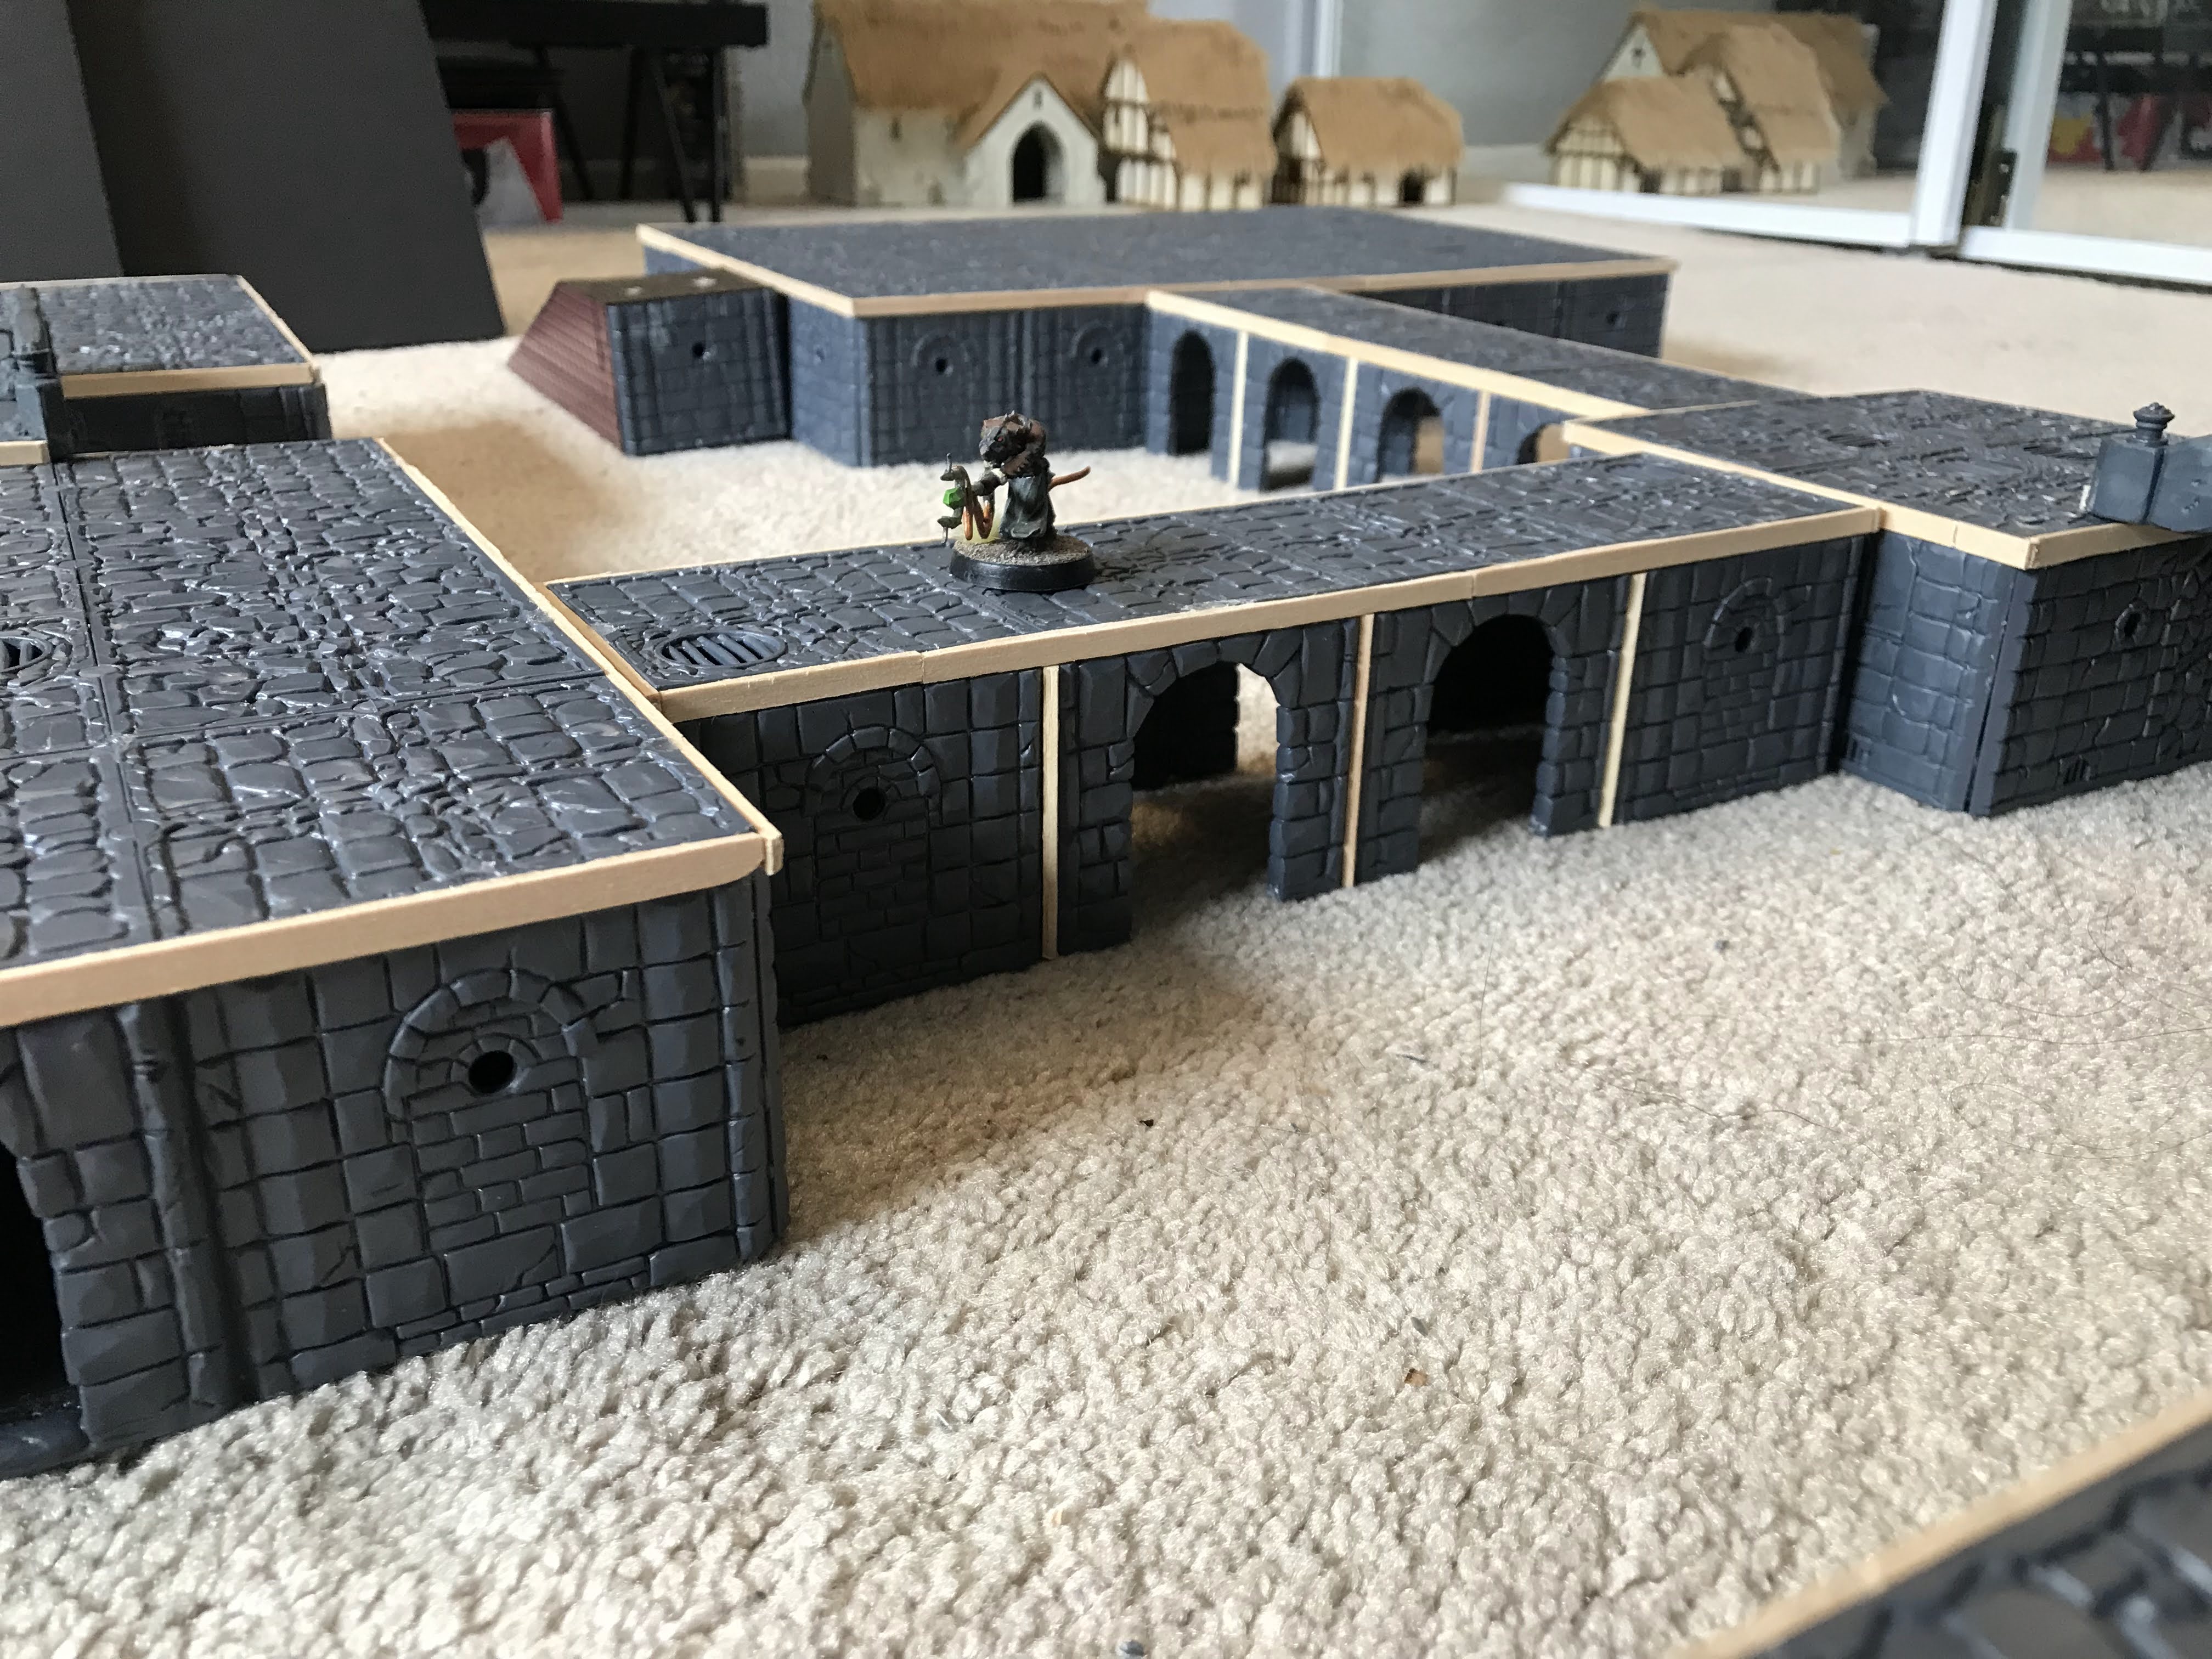
First things first, take your Fantasy Core set and take out all of the floor tiles. Lay them out and group them together to create rectangular shapes. Mix and match until you find the layout that you like. I opted to have 1 very large platform, 1 large platform, 3 medium platforms, 1 small platform, and 2 thin "bridge" sections. The ramps did not use any floor tiles.
Next, gather some wall tiles and get the amount you need to cover the perimeter of the floor tiles. I like to use a mix of long and short wall tiles not only for variety but to provide strength. I recommend keeping all of the wall tiles with doors to use for the bridge portions. You will also need 2 short wall sections for the ramp.
Ordinarily, the Dungeons & Lasers system will use the pegs at the bottom of the wall tiles to connect the floors, and if you want to make a roof to go over that you have to use another style of connector to put the floor tiles over. Now, since these would be enclosed rooms that got glued together, that would be a waste of floor tiles, which are already at a premium in this kit. So instead, we will use foamcore to be the floor and provide structure. I also want the platform to be flush with the gaming table, so none of the foamcore should show through. So take all of the wall tiles you are going to use, and clip off the pegs at the bottom. They should end up looking like the photo below.
Now we get to do a lot of measuring. Do NOT measure from end to end, as the wall tiles connect a diagonal. Viewed from above, each wall tile looks like this:
<==>
So if you combine walls together like so:
<====><==>
The length of foamcore you will need is
====><==
You also have to measure this distance for every combination of lengths you will use. My numbers came out to the below:
2 x wall = 4 1/2 in
3 x wall = 6 7/8 in
4 x wall = 9 3/16 in
6 x wall = 13 7/8 in
The below photo is a 3 x wall, as I count each long wall as 1x.
You will note I did not use a 5 x wall, so if you want that size you'll have to do your own measurements. Once you have those dimensions, cut out all of the foamcore you'll need, and will end up with the below.
Take all of your wall tiles and glue them around the perimeter of your foamcore cut outs. I used hot glue as a) it's faster and b) it doesn't melt foam. You could use PVA, but you will be holding things together for a long time. Each wall tile has two different faces, so flip them around as you desire to get the look you want. I also glue along joints where walls meet foamcore or walls meet walls, for stability.
And that's the walls done, onto the ceiling. Connect all your floor tiles together into the shapes that match your foamcore. Use the clips provided. I also filled the center holes of each of these clips with the included pegs, but you can skip this step if you want to connect any of your spare walls. I don't like the unsightly holes, so I filled them in. For the larger platforms, I cut some dowels to provided some support so that they don't sag. It should look like the below.
Take some plastic cement and pour it along the top ridges of the wall. Carefully place the floor tiles on top, taking care to center it. I used some dumbbells to keep the parts together and in place. If done properly, the floors will be just to short to cover the tops of the wall tiles. This is intentional on the part of the designers, as it gives some room for the multi-story clips that are available. I don't like these clips as they protrude out from the model and won't let models sit flush together.
Now you have to cover the ledges. I take a standard sized popsicle sticks, cut the rounded ends off, and cut it in half lengthwise. It turns out to be the perfect size to fill the gap.
You will have some holes left between the popsicle sticks and some of the floor tiles. I took some hot glue, filled it in, and then cut it flush with an x-acto knife. You won't really notice this once painted.
The bridges followed the same process, but I skipped the foamcore part. You'll have to hold things together until you glue the floors to the walls. I clipped the bottom of the door away to create the arches. I used the matchstick dowels in between walls for some extra stability.
For the ramps, I failed to take a lot of photos of the process, but here's the foamcore dimensions I used. I used super glue to attach the rubbery cobblestone and brick textures to the paper side of the foamcore. Luckily, they cut very easily.
Once you have all that done, you'll end up with the below:
I glued some sand to the ramps, as the angle caused some models to slide down. This gives some traction to prevent that.
Painting was simple, but I drybrushed a dark blue all over to give the stone a different hue than a basic grey.

I then worked my way up to lighter and lighter drybrushes of grey, with a wash of black paint. I picked out a few stones in brown for variety. I also drybrushed green around the bases to give a hint of moss growth.
And there you have it, that's how I made my elevated platforms. Now you can play with them in game, rearranging as needed. Of course you can add set dressing as needed, I threw in some extras that I've made or from the
Battle Systems terrain kits.
The mat you use can also completely change up the scenario. A water mat creates a locale like Venice, and you can have some dock fights in your games.
Thanks for reading, now go out and make some for yourself!
-The Space Dinosaur


That looks awesome!
ReplyDeleteThank you!
DeleteNicely written tutorial on the process and the end result is really quite stunning. Great job. I especially like the use as a dock. 😀😀
ReplyDeleteThanks for sharing.
Thanks I really appreciate that! It was fun to play around with all of the different set ups, and I was looking forward to the dock setup and it was just as good as I was hoping for.
Delete