
Now on to the recipe...
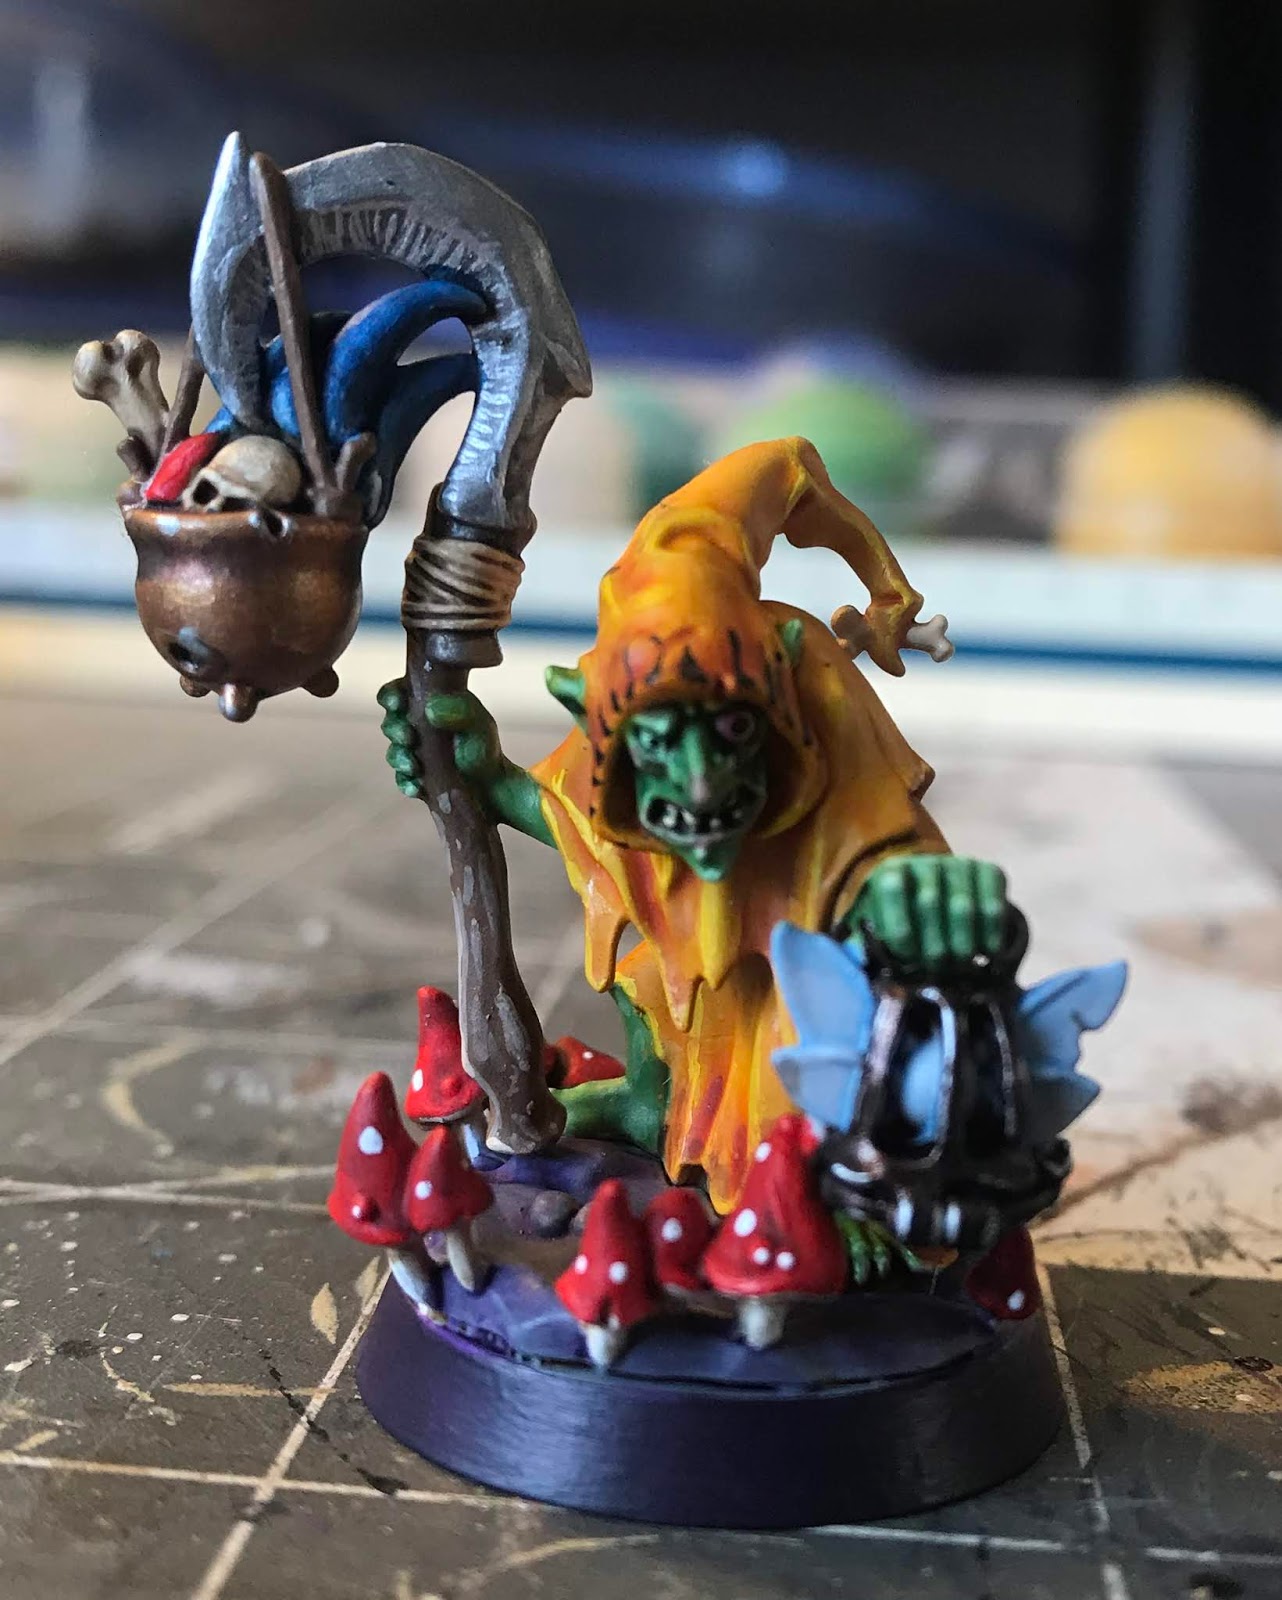
The model I'm using for this tutorial is Zarbag, from the Warhammer Underwolds warband Zarbag's Gitz. In my opinion, it is a wonderful little model full of character and details. So for this paint recipe I'm going more in depth, using some more advanced techniques than I usually show, but nothing so difficult as to stop a beginner from trying it out.
Step 1: Basecoat
Next are the robes. A basecoat of Averland Sunset washed with Casandora Yellow does most of the legwork. To finish, a highlight of Flash Gitx Yellow to pick out the remaining details does the trick. However, I wanted to add some extra color, so I washed the lower portion of the robes as well as the area around the hood opening. Using the same wash, I dabbed a bit of color onto the cheeks and the very tip of the nose to give the green a nice contrast. Since Zarbag is a hero model, I painted a flame pattern around the hood with Matt Black.

Step 2: The Staff

The staff was fairly simple. A basecoat of Leather Brown and highlight of Flayed One Flesh with a wash of Agrax Earthshade completes the wooden portion. The sickle at the top is a little more involved. The base is Plate Mail Metal washed with Dark Tone. Now the tricky part. Painting very thin lines with Shining Silver along the inner facet gives the blade "texture" and helps to provide visual interest in an otherwise flat surface. Take your time with this, and remember you can always use Plate Mail Metal to cover up mistakes. A final highlight along the raised edges with Shining Silver finishes the sickle blade. The rope and bones are Flayed One Flesh washed with Agrax Earthshade and then highlighted with Flayed One Flesh again. This same process can be used on teeth and fingernails.

Step 3: The Shrooms

A variety of mushrooms appear on this model, and I decided to give the two different types different colors to distinguish them as well as give some spot colors to the overall scheme. The mushrooms around the base Pure Red washed with Red Tone then highlighted again with Pure Red to bring some details back. The stalks and dots are Matt White, but the stalks received a wash with Soft Tone at the juncture between the stalk and the cap.

The blue mushrooms are based in Electric Blue and I painted thin white lines around the frills. Successive washes with Blue Tone up the mushrooms helps to give a smooth gradient from white to dark blue.
The leather pouches follow a similar pattern to the staff, but you can paint them up however you please.
Step 4: The Fairy Cage and Pot

The fairy or sprite that is in the cage used Electric Blue diluted with Lahmian Medium to create a glaze. Using a wash here would dry patchy, and you want these hue to go on smooth. Make sure the fairy is still in the original grey priming, otherwise any paint dots will show through and ruin the effect.
For the cage, carefully paint around the fairy with Warplock Bronze. Do your best not to get any of this dark color on the fairy, as covering it with grey will take many layers. A highlight of Shining Silver on the raised edges recovers the details lost by using such a dark color.

The pot hanging from the sickle was super quick, a base of Brass Scorpion, highlights of Liberator Gold, and small spot highlights of Shining Silver is all it takes. With that, the model is complete and just requires the base.
Step 5: The Base

Since this is a Warhammer Underworlds model, the base is already sculpted and so requires no texturing. A basecoat of Uniform Grey followed by a Purple tone wash makes it look as if Zarba is walking through some dank cave. The rim is just a mixture of Alien Purple and a small (small!) dot of Matt Black. And there you have it, he's all done and ready to go! You can use these steps to paint more or less any of the Gloomspite goblins, so why not give it a try!


No comments:
Post a Comment